Your computer runs hot—especially when gaming, rendering, or pushing heavy workloads. Without proper airflow, that heat builds up, leading to throttling, instability, and even hardware damage. The best computer fan setup isn’t just about slapping in as many fans as possible—it’s about smart placement, airflow direction, and balancing pressure for optimal cooling.
Most modern cases support multiple fan positions, but few users take full advantage of them. A well-designed fan configuration keeps components like the CPU, GPU, and power supply cool while minimizing dust buildup and noise. In this guide, you’ll learn how to plan, install, and optimize the best computer fan setup for your case, whether you’re building a high-performance rig or upgrading an existing system.
Choose the Right Case First
Your case is the foundation of any effective cooling strategy. It determines how many fans you can install, where they go, and how well air moves through the system. A poorly designed case will limit even the highest-performing fans.
Know Your Case Fan Mounts
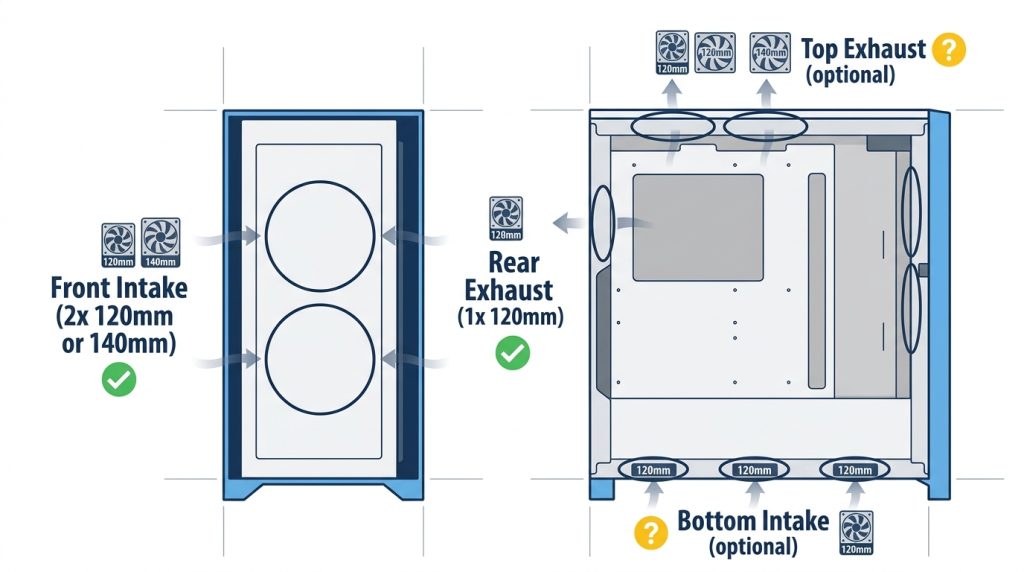
Check your case specifications for supported fan sizes and locations:
• Front: Typically supports 2–3 x 120mm or 140mm fans (intake)
• Rear: Usually 1 x 120mm or 140mm (exhaust)
• Top: Can fit 2–3 fans, but usage depends on cooling type
• Bottom: Often used for PSU intake or GPU cooling
Full-tower cases offer more flexibility, while mini-ITX builds restrict options. Always verify mounting points before purchasing fans.
Prioritize Front and Rear Airflow
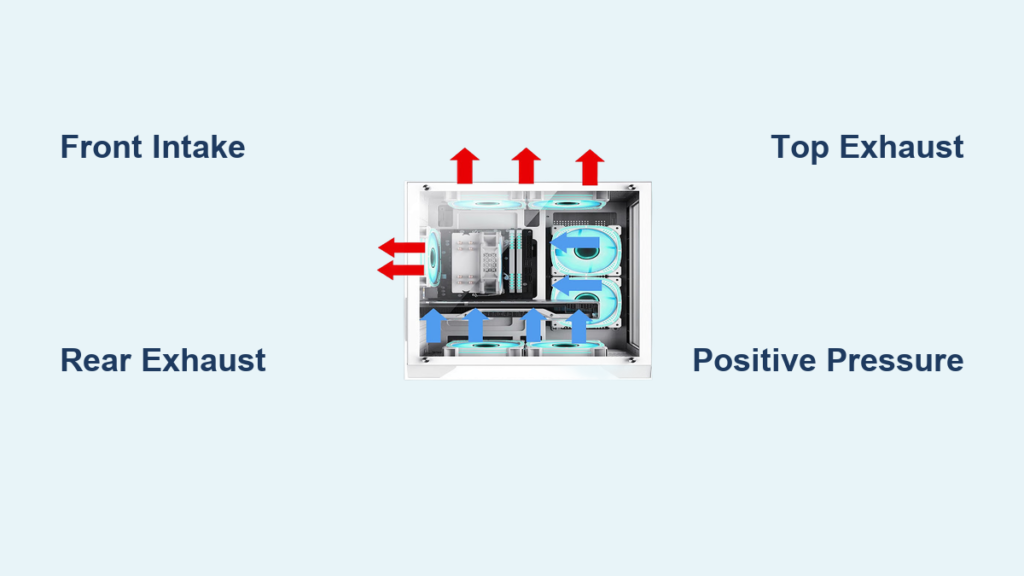
The most efficient airflow path follows a front-to-back pattern:
• Front fans pull in cool air
• Rear fan expels hot air
This straight-line flow cools the CPU, VRMs, and motherboard effectively. Never skip the rear exhaust—every best computer fan setup includes at least one.
Use Top Fans Wisely
Top fans should usually act as exhaust:
• Hot air naturally rises and accumulates near the top
• Exhaust fans remove heat from CPU coolers and GPUs
Avoid top intake unless your case has excellent dust filtration. Some high-airflow models like the Lian Li PC-O11 Dynamic benefit from top intake, but require regular cleaning.
Determine Airflow Type: Positive or Negative Pressure?

How you balance intake and exhaust affects cooling, noise, and dust. The best computer fan setup uses slightly positive pressure.
What Is Positive Pressure?
• More intake airflow (CFM) than exhaust
• Forces air out through gaps and vents
• Reduces dust by preventing unfiltered air from being sucked in
Example: 3 intake fans (180 CFM) vs. 2 exhaust fans (120 CFM)
This setup is ideal for most users who want clean, quiet, and efficient cooling.
What Is Negative Pressure?
• More exhaust than intake
• Sucks air in through unsealed gaps
• Can improve cooling in controlled environments but increases dust
Only use strong negative pressure if you clean frequently and keep your PC off the floor.
Balanced Airflow: A Middle Ground
Equal intake and exhaust CFM works in filtered cases. It offers no dust advantage but keeps noise and pressure neutral. Best for moderate builds where extreme cooling isn’t needed.
Ideal Fan Counts by Case Size
The best computer fan setup varies by case size. More fans aren’t always better—placement and balance matter most.
Mini-ITX Cases (Small Form Factor)
• Max 3 fans: 1 front intake, 1 rear exhaust, 1 top exhaust
• Use high-static-pressure fans for tight spaces
• Rely on component fans (GPU, CPU cooler) for additional cooling
Tip: Prioritize exhaust—heat must escape even in small builds.
Mid-Tower Cases (Most Common)
• Ideal: 3 intake, 2 exhaust
• Front: 2–3 intake fans
• Rear: 1 exhaust fan
• Top: 1–2 exhaust fans
Models like the Fractal Design Meshify C and NZXT H510 perform best with this layout. It creates strong front-to-back flow and removes CPU heat efficiently.
Full-Tower Cases (High-End Builds)
• Up to 8 fans: 4 intake, 3–4 exhaust
• Front: 3 intake
• Rear: 1 exhaust
• Top: 2–3 exhaust (or mixed for radiators)
• Bottom: 1–2 intake (for GPU or PSU)
Ideal for dual GPUs, liquid cooling, or overclocked systems needing maximum airflow.
Fan Placement: Intake vs. Exhaust by Location
Strategic placement ensures cool air reaches hot components and exits quickly.
Front Fans: Always Intake (Usually)
• Pulls cool air directly over motherboard components
• Feeds fresh air to CPU and GPU
• Use high-airflow fans like Arctic P12 or Noctua NF-A12x25
Exception: In reversed builds (rare), front may be exhaust—but not recommended.
Rear Fan: Always Exhaust
• Removes hot air from CPU and VRMs
• Shortest exit path from the case
• Use a reliable PWM fan for consistent performance
Even the stock rear fan is better than nothing—never leave this spot empty.
Top Fans: Mostly Exhaust
• Hot air rises—top exhaust pulls it out
• Critical when using large air coolers
• Avoid conflict with top-mounted radiators
Only use top intake if your case has filtered panels and you’re using a push-pull radiator.
Bottom Fans: Use with Caution
• Can draw in dust if near the floor
• Useful for GPU cooling if close and filtered
• Always install dust filters
Best used in raised cases with removable bottom filters.
Choose the Right Fan Type

Not all fans serve the same purpose. Match fan type to its role.
Airflow Fans (High CFM)
• Move large volumes of air
• Best for intake and exhaust
• Examples: Arctic P12 PWM, Noctua NF-F12
Use on front and rear for maximum ventilation.
Static Pressure Fans
• Push air through resistance (radiators, dense grills)
• Ideal for top-mounted radiators
• Examples: Noctua NF-A12x25, be quiet! Silent Wings Pro 4
Use when airflow is restricted.
Balanced Fans
• Good mix of airflow and pressure
• Suitable for general use
• Examples: Corsair ML120, Lian Li AL120
Perfect for mixed-role setups or budget builds.
Optimize Fan Curves and Speed
Even the best physical setup fails without proper control. Use BIOS or software to fine-tune performance.
Set Smart Fan Curves
• Start at 30–40% speed during idle
• Gradually increase with temperature
• Cap at 80–90% under load to reduce noise
This keeps cooling effective without constant loud spinning.
Monitor Temperatures
Use tools like:
• HWInfo (comprehensive sensor data)
• MSI Afterburner (real-time GPU temps)
• Core Temp (CPU monitoring)
Adjust curves if CPU exceeds 80°C or GPU hits 85°C under load.
Synchronize with Motherboard
Connect fans to:
• SYS_FAN headers for case fans
• CPU_FAN for cooler
• Use hubs or splitters if needed
Avoid daisy-chaining too many fans on one header—can overload the board.
Common Mistakes to Avoid
Even experienced builders make errors. Avoid these in your best computer fan setup.
Installing Fans Backward
Fans have a direction. Check the label or arrow:
• Intake: Pulls air into the case
• Exhaust: Pushes air out
A backward fan disrupts airflow and reduces cooling.
Blocking Air Paths
Cable clutter blocks airflow. Use:
• Zip ties or Velcro straps
• Modular PSU for cleaner routing
• Route cables behind the motherboard tray
Keep the front-to-back path clear for smooth airflow.
Ignoring Dust Filters
Dust reduces cooling efficiency. Clean filters every 1–3 months. Cases with magnetic or removable filters make maintenance easier.
Overloading with Fans
Too many fans cause turbulence and noise. 5–6 well-placed fans outperform 8 poorly arranged ones. Focus on balance, not quantity.
Liquid Cooling vs. Airflow
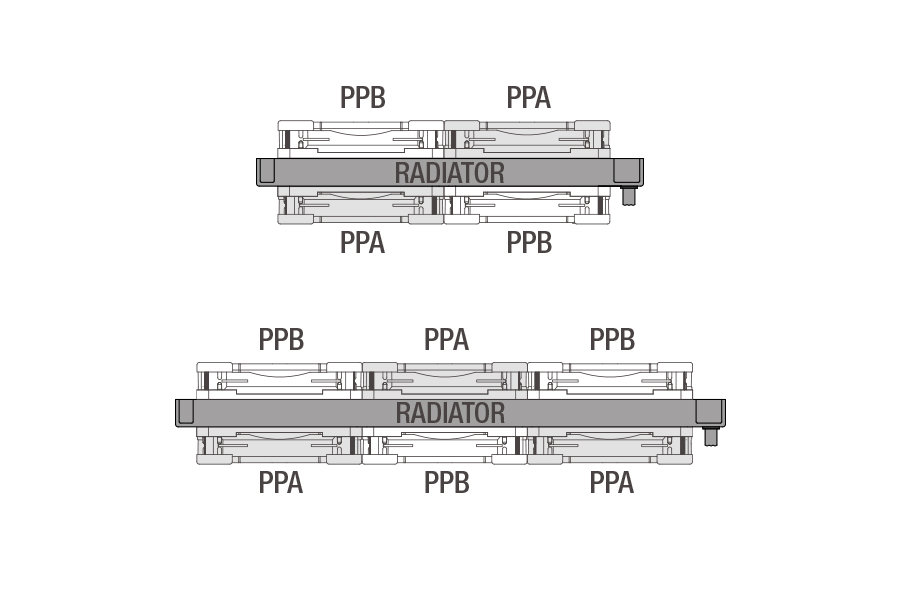
AIOs and custom loops change fan needs. Adjust your setup accordingly.
Radiator Placement
• Front radiator: Use as intake (pulls cool air through coolant block)
• Top radiator: Use as exhaust (releases heat upward)
• Rear radiator: Rare and often conflicts with GPU
Always align fan direction with radiator function.
Push-Pull Configurations
Mount fans on both sides of a radiator:
• Push: Front side (intake)
• Pull: Back side (exhaust)
Boosts cooling for high-TDP CPUs but increases noise.
Don’t Neglect Case Fans
Even with liquid cooling, the GPU, RAM, and VRMs need airflow. Never remove all case fans—your best computer fan setup includes both radiator and case ventilation.
Quiet vs. Performance Setups
Tailor your setup to your priorities.
Quiet Build: Low Noise, Moderate Cooling
• Use 3–4 high-quality, slow-spinning fans
• Set conservative fan curves
• Choose positive pressure to reduce dust and fan speed
• Pick cases with sound dampening (e.g., Fractal Define 7)
Accept slightly higher temps for a silent experience.
Performance Build: Max Cooling, Accept Noise
• Use 5–6 high-CFM fans
• Set aggressive fan curves
• Slight negative pressure if dust isn’t a concern
• Focus on direct component cooling
Best for overclocked systems and gaming rigs.
Frequently Asked Questions About Best Computer Fan Setup
What is the best fan configuration for cooling?
Use 3 intake (front) and 2 exhaust (rear and top). This creates strong front-to-back airflow with slight positive pressure, offering optimal cooling and dust control.
Should top fans be intake or exhaust?
Top fans should usually be exhaust. Hot air rises, so exhaust fans remove heat from the CPU and GPU. Only use top intake if your case has filtered panels and you’re running a radiator.
How many fans do I need in a mid-tower?
For a mid-tower, 5 fans are ideal: 3 front intake, 1 rear exhaust, and 1–2 top exhaust. This balances airflow, pressure, and noise for most builds.
Does positive pressure reduce dust?
Yes. Positive pressure pushes air out through gaps, preventing unfiltered air from being sucked in. This reduces dust accumulation and improves long-term cooling.
Can too many fans hurt airflow?
Yes. Overloading a case with fans creates turbulence and noise. Poorly placed fans can cancel each other out. Focus on balanced placement over quantity.
Do I need case fans with liquid cooling?
Yes. Liquid cooling only handles the CPU. Case fans are essential for GPU, VRM, RAM, and overall airflow. Never remove all case fans even with an AIO.
Key Takeaways for the Best Computer Fan Setup
• Start with a simple layout: 2 front intake, 1 rear exhaust, 1 top exhaust
• Use slightly positive pressure to reduce dust and improve efficiency
• Match fan type to role—airflow for intake/exhaust, static pressure for radiators
• Optimize fan curves using BIOS or software
• Clean dust filters regularly and keep cables tidy
The best computer fan setup isn’t about having the most fans—it’s about using the right ones in the right places. Test your build with stress tools like Prime95 or FurMark, monitor temperatures, and adjust as needed. A well-optimized airflow system keeps your PC cool, quiet, and reliable for years.