Copying a DVD to your computer is one of the most effective ways to preserve movies, home videos, and educational content. Whether you’re safeguarding family memories, backing up purchased films, or digitizing old course materials, transferring DVDs to digital files ensures they remain accessible as physical players disappear. The best way to copy DVD to computer involves using reliable software that bypasses copy protection, maintains high quality, and optimizes file size—all while being easy to use. Not all tools are equal: some merely duplicate files, while others decrypt, compress, and enhance video for modern devices.
This guide reveals the most proven methods for ripping DVDs, including free and paid tools, step-by-step workflows, format optimization, and solutions to common issues. You’ll learn how to avoid blurry upscaling, reduce file sizes by up to 80%, preserve multiple audio tracks and subtitles, and organize your digital library efficiently. Whether you’re on Windows or Mac, using a built-in or external DVD drive, this guide covers everything you need for optimal results.
Choose the Right DVD Ripping Method for Your Needs
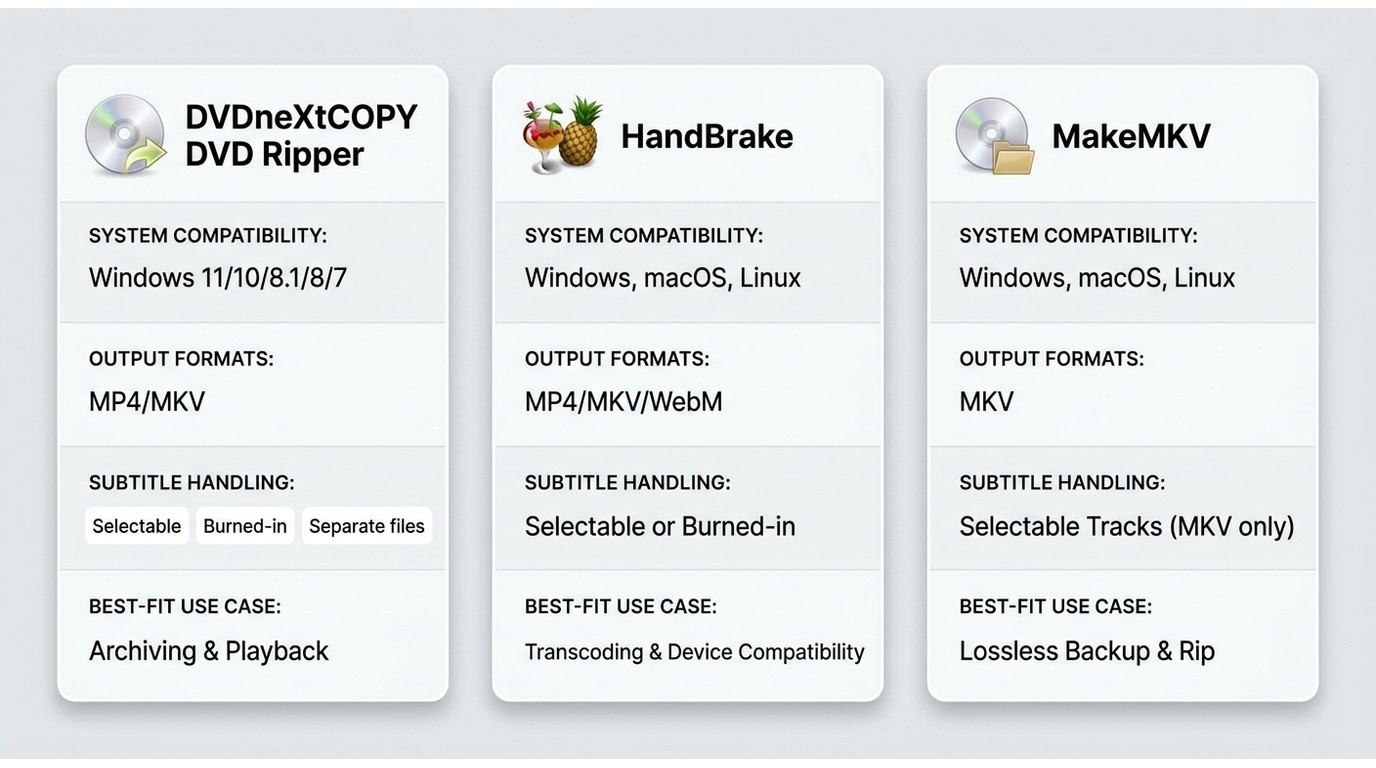
Match Your Tool to Your Goal
The best approach depends on your priorities: quality, file size, speed, or simplicity. Four main methods stand out, each suited to different scenarios.
MakeMKV + HandBrake (Best for Quality & Compression):
Rip losslessly with MakeMKV, then compress with HandBrake. Preserves all audio, subtitles, and original quality while cutting file size by up to 80%. Ideal for long-term archiving and mobile playback.
VideoProc Converter AI (Best All-in-One Paid Option):
AI-enhanced upscaling, stabilization, and hardware acceleration. Converts DVDs directly to MP4, MOV, or HEVC in one click. Perfect for users who want high-quality output with minimal effort.
VLC Media Player (Free & Simple):
Built-in DVD ripper. Works well for unprotected discs but struggles with encrypted or damaged DVDs. Great for quick backups if you already have it installed.
Direct File Copy (For Non-Protected DVDs):
Only works on homemade or educational DVDs without CSS encryption. Simply drag the VIDEO_TS folder to your computer. Fast but doesn’t decrypt or compress.
Use MakeMKV for Lossless DVD Ripping
Install and Set Up MakeMKV
MakeMKV is the top choice for extracting DVD content without quality loss. It decrypts CSS-protected discs and outputs a single MKV file with all video, audio, and subtitle tracks.
- Download MakeMKV from the official site (Windows or Mac).
- Install using default settings.
- Enable CD-ROM Device Arbiter during setup—this helps detect optical drives.
- Insert your DVD. MakeMKV should auto-detect it.
If the disc isn’t recognized, close and reopen the app or try a different USB DVD drive (available for under €15).
Select Tracks and Rip the DVD
- Go to File > Open Disc.
- Wait for the scan to complete. MakeMKV identifies real content and skips dummy files.
- In the title list, select the main movie (usually the longest track).
- Under Tracks, choose:
• Video: Cannot be deselected.
• Audio: Pick your preferred language(s) (e.g., English 5.1, French stereo).
• Subtitles: Select standard subtitles; disable hard-of-hearing tracks unless needed. - Set output folder (e.g.,
C:\Ripped DVDs). - Click Make MKV.
Ripping takes just a few minutes. The result is a large but pristine MKV file—perfect for compression with HandBrake.
Optimize Files with HandBrake
Install HandBrake Correctly
HandBrake compresses video efficiently without visible quality loss. It supports H.265/HEVC encoding, which reduces file size by up to 10x compared to H.264.
- Download the correct version:
• Windows/Intel/AMD: Standard build
• Apple Silicon (M1/M2): ARM64 version - If you see a .NET error, install Microsoft .NET Runtime from Microsoft’s site.
- Launch HandBrake.
Import and Configure Optimal Settings
- Drag the ripped MKV file or DVD folder into HandBrake.
- Use Folder Batch Scan to process multiple DVDs at once.
Key Settings for Best Results
Summary Tab:
• Format: MKV (supports multiple audio/subtitle tracks)
Dimensions Tab:
• Resolution & Scaling: Automatic
• Anamorphic: Automatic
• Cropping: Automatic — removes black bars from PAL/NTSC DVDs
⚠️ Never upscale DVDs to 1080p. DVDs are only 720×480 (NTSC) or 720×576 (PAL). Basic upscaling creates blurry results. Use AI tools like VideoProc for true enhancement.
Filters Tab:
• Interlace Detection: Default
• Deinterlace: Use Decomb — removes flicker on fast motion, essential for mobile playback
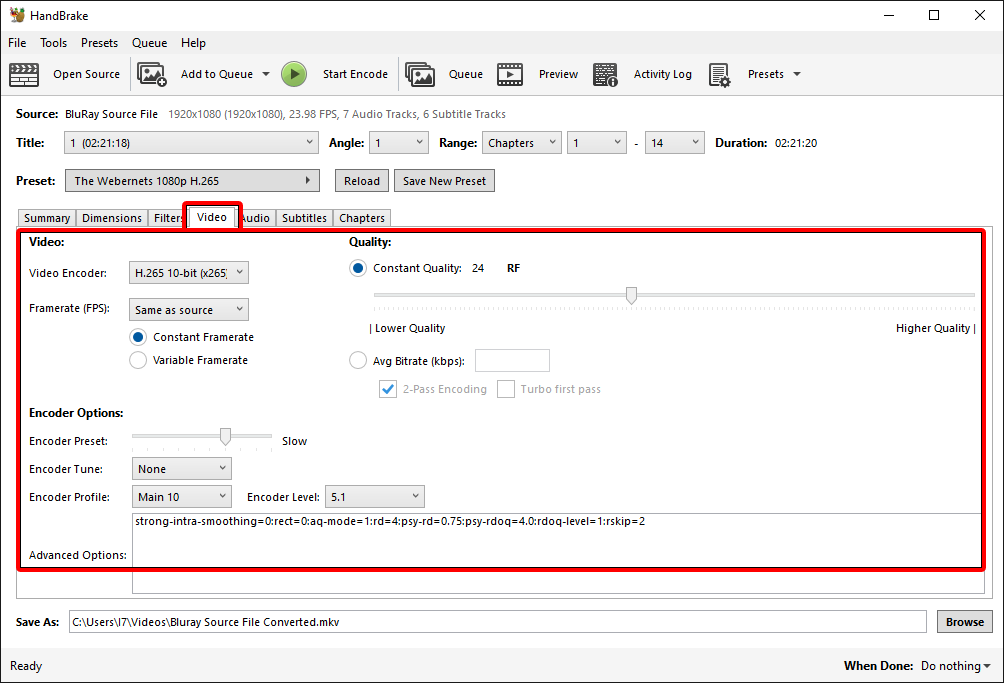
Video Tab:
• Encoder: H.265 (HEVC) — best compression
• Frame Rate: Same as source, Constant
• Quality: Constant Quality (CRF) 20 — ideal balance of size and clarity
Audio Tab:
• Add Tracks: Include all desired languages
• Codec: AC3 Pass-Through — preserves original surround sound
• Convert to AAC only if needed for older devices
Subtitles Tab:
• Foreign Audio Scan: Enable
• Track Selection: Add all subtitle tracks
• Burn-in Behavior: None — keeps subtitles optional
• Use Selection Behavior to auto-select English, French, Dutch, etc.
Save Preset and Batch Process
- Click Add to Queue for each title.
- Save settings as a preset (e.g., “DVD Archive”) for reuse.
- Press Start Queue.
- Enable Shutdown after encoding (under Options) for overnight ripping.
Try VideoProc Converter AI for AI-Enhanced Ripping
One-Click DVD to MP4 Conversion
VideoProc Converter AI offers a seamless, all-in-one solution with AI-powered enhancements—ideal for old home videos.
- Launch the app and click the DVD tab.
- Select DVD Disc and click Done to load.
- Choose output format:
• MP4 (H.264): Most compatible
• HEVC: Smaller files
• Device-specific: iPhone, Android, etc. - Click Settings to adjust:
• Quality: Slow (best), Fast (quick)
• Resolution: 1080p (HD)
• Codec: H.264 or H.265 - Rename the file (e.g., “Family Reunion 2005”).
- Set output folder.
- Click Run.
With hardware acceleration (NVIDIA, AMD, Intel), a 2-hour movie converts in 10–20 minutes.
AI Features for Old Videos
• Super Resolution: Upscales 480p to HD or 4K
• Frame Interpolation: Smooths choppy footage
• Stabilization: Reduces shakiness from handheld recordings
• Screen Recording: Bonus tool for tutorials
Free trial available; full features require license.
Rip DVDs with VLC (Free & Fast)
Use VLC for Quick Backups
If you already have VLC installed, use it for simple, unprotected DVDs.
- Insert DVD.
- Open VLC → Media → Convert / Save (
Ctrl + R). - Click Disc tab.
- Select DVD, choose drive letter (e.g., E:).
- Click Convert / Save.
- Choose profile: Video – H.264 + MP3 (MP4).
- Click Browse, set save location.
- Click Start.
Processing time varies by length and system speed.
Fix “DVD Read Could Not Read” Error
If VLC fails:
• Clean the DVD with a soft cloth.
• Try a different drive.
• Use MakeMKV or HandBrake—they handle encryption better.
Copy Files Directly (No Protection)
Transfer Non-Copy-Protected DVDs
For educational or homemade DVDs without CSS encryption:
- Insert DVD.
- Open File Explorer → This PC.
- Right-click DVD drive → Open in New Window.
- Look for:
•VIDEO_TSfolder (contains.vobfiles)
• Course folders (e.g., “Week 1”, PDFs, MP3s)
If you see only “Ready to Be Written to Disc”, the content may be hidden. Enable Hidden items in View settings.
Copy and Organize Files
- Create a folder on desktop (e.g.,
Level One). - Drag
VIDEO_TSand other content into it. - Rename
.vobfiles for clarity (e.g.,Week1_Lesson1.vob). - Play
.vobfiles with VLC or rename to.mpg2.
This method preserves all file types—ideal for courses with PDFs, MP3s, and Guitar Pro files.
Pick the Best Output Format
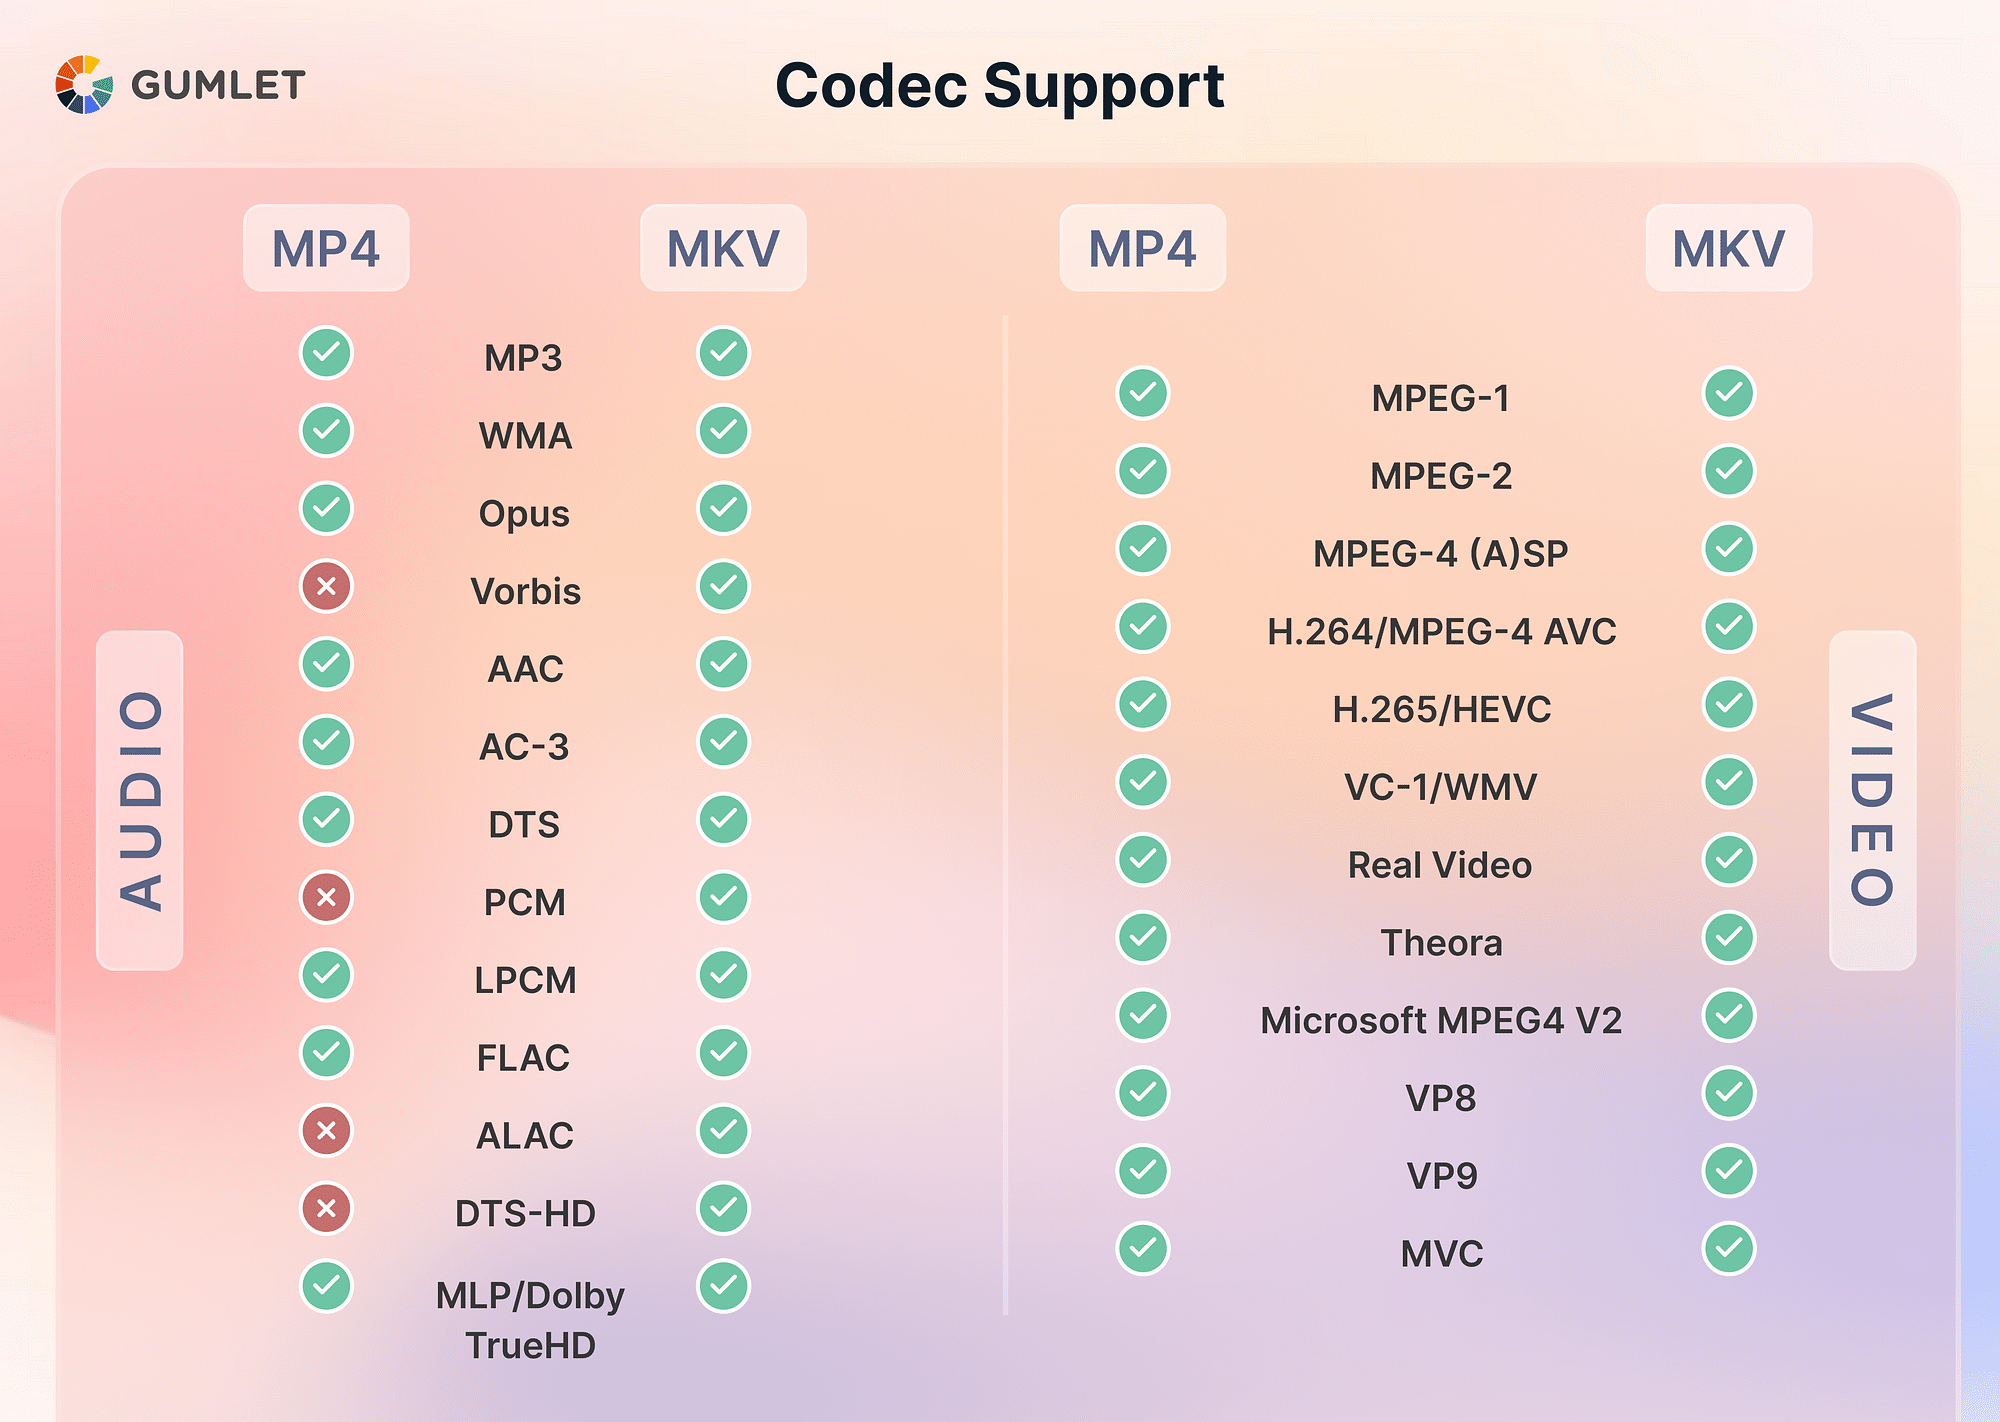
Compare Video Formats
| Format | Best For | Pros | Cons |
|---|---|---|---|
| MP4 (H.264) | General use | Universal playback | Larger than HEVC |
| MKV | Multi-audio/subtitles | Preserves all tracks | Less compatible |
| HEVC/H.265 | Archival, mobile | 80% smaller files | Needs modern hardware |
| ISO Image | Full disc backup | Keeps menus, structure | Very large size |
Recommendation: Use MKV with HandBrake for quality, MP4 for sharing.
Optimize Performance
Enable Hardware Acceleration
VideoProc and HandBrake use GPU acceleration to speed up encoding.
• VideoProc: Auto-detects NVIDIA, AMD, Intel GPUs
• HandBrake: Monitor GPU usage during encoding (normal to be high)
If acceleration isn’t detected:
• Update GPU drivers
• Conversion still works via CPU (slower)
Use More CPU Cores
In VideoProc, increase CPU Core Usage (8–16 cores) for faster processing. Default is fine for most.
Batch Process Overnight
Use HandBrake’s Folder Batch Scan to queue multiple DVDs. Enable Shutdown after encoding to save power.
Fix Common Ripping Issues
Empty Folder After Copy?
You’re seeing a placeholder, not the actual content. DVDs use VIDEO_TS structure, which isn’t always visible. Use MakeMKV or HandBrake to extract real video.
MakeMKV Not Detecting Disc?
• Close and reopen the app
• Restart
• Ensure CD-ROM Device Arbiter is enabled
• Try a USB external drive
Can’t Play .vob Files?
• Use VLC Media Player
• Rename .vob to .mpg2
• Convert to MP4 with HandBrake