If you need to record your computer screen with audio—whether for a tutorial, presentation, meeting recap, or content creation—you’re not alone. Millions do it daily, and the best way to record computer screen with audio depends on your needs: simplicity, editing power, platform, or sharing speed. The good news? You don’t need expensive software or technical skills. From built-in Windows tools to free online recorders and professional-grade apps, there’s a perfect solution for every user.
This guide delivers a clear, step-by-step breakdown of the most effective screen recording methods that capture both system audio and microphone input. You’ll learn how to avoid common audio issues (like missing system sound), choose the right tool for your OS and use case, and export high-quality videos—fast. Whether you’re on Windows 11, Mac, or just want a no-install browser solution, we’ve got you covered.
Windows 11 Built-in Screen Recorders with Full Audio
Windows 11 includes free tools that capture both system and microphone audio—no downloads needed. The Snipping Tool and Game Bar are powerful for quick, high-quality recordings.
Use Snipping Tool to Record Screen and Audio Together
The updated Snipping Tool doubles as a full-featured screen video recorder with audio support.
- Open Snipping Tool from the Start menu
- Click Video mode (not “New Snip”)
- Tap the three dots (⋯) → Settings
- Enable:
– Include microphone input by default
– Include system audio by default - Click Start recording, select your screen area, and go
What it captures:
✅ System audio (videos, music, app sounds)
✅ Microphone voice
✅ Mouse movements
Best for: Quick tutorials, classroom clips, or internal team videos.
Limitation: No webcam overlay or advanced editing.
Activate Game Bar to Capture System Audio and Mic
Game Bar works beyond gaming—it’s ideal for recording meetings, webinars, or software demos.
- Press
Win + Gto open Game Bar - Click the Record button or press
Win + Alt + R - Go to Audio settings (gear icon)
- Turn on:
– System Audio
– Microphone
Critical setup tip:
Ensure your default output device is correct in Settings > System > Sound. If Stereo Mix is available, enable it in Sound > Recording tab > Show Disabled Devices.
Note: Game Bar may fail to capture system audio with some wireless headphones due to audio routing conflicts. Test with wired speakers first.
Clipchamp: Free Microsoft Web Recorder for Browser Tabs
Clipchamp, owned by Microsoft, is a free online editor with a built-in screen recorder—perfect for recording and editing in one place.
Record Browser Tab with System Audio and Mic
Clipchamp captures system audio—but only when recording a browser tab, not desktop apps.
- Go to clipchamp.com
- Click Record & Create → Screen or Screen & Camera
- Allow mic and camera access
- Choose:
– Entire screen, window, or browser tab
– Toggle audio sharing ON - Click Share → recording starts after countdown
Pro tip: To record Chrome tabs, open Clipchamp in Chrome. For Edge tabs, use Edge.
Edit and Export with Clean Audio
After recording:
– Click Save and Edit
– On the timeline, detach audio to edit separately
– Trim, mute, or split clips
– Add text, transitions, or resize webcam feed
– Export as MP4 (original WebM format converts automatically)
Limitation: System audio only works in browser tab mode. Desktop app audio won’t be captured.
Top Free Desktop Screen Recorders with Audio
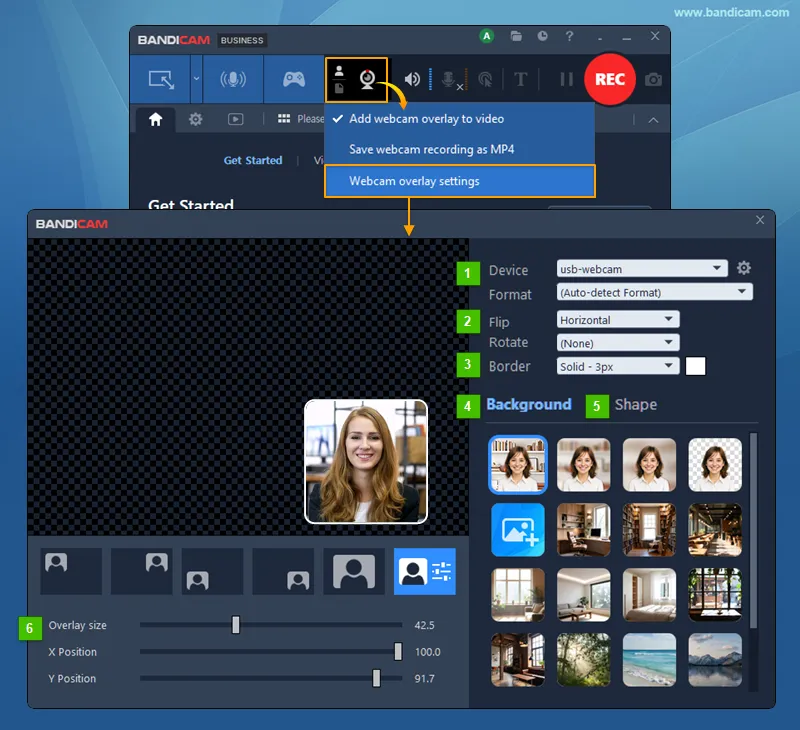
For full control over system audio, mic, and webcam, third-party desktop apps offer the most reliable results.
ScreenRec: Instant Cloud Sharing with Audio
ScreenRec is one of the fastest and most user-friendly free screen recorders.
Why it stands out:
- Records system audio + mic + webcam simultaneously
- Saves as MP4 with no watermark
- Auto-uploads to private cloud—sharing link copies instantly
- Works offline: records locally, uploads when back online
- Supports 1080p at up to 120 FPS
Setup in 3 steps:
- Download from screenrec.com
- Select recording area
- Click Record → narrate and capture
Perfect for: Customer support, quick demos, or team walkthroughs.
User love: “It’s SO EASY to use that a child could use it!” – Gerry D., Bright Marketing Co.
Bandicam: Record with Keystrokes and Click Effects
Bandicam offers advanced features in a clean interface.
Key features:
- Record specific window, area, or full screen
- Capture system audio + mic together
- Add real-time drawing, keystroke overlay, or click effects
- Trim videos and generate AI subtitles
- Direct upload to YouTube, Google Drive, or Vimeo
Free version limits:
- 5-minute max per recording
- No watermark on recordings
- Hotkey: Press F12 to start/stop
Best for: Tutorials, software demos, or scheduled recordings (e.g., auto-start before Zoom meetings).
ScreenPal Desktop: AI Editing and Background Blur
ScreenPal (formerly Screencast-O-Matic) combines recording with smart editing.
Free features:
- 15-minute recording limit
- Record screen + webcam + mic
- Remove or blur background
- Trim, cut, add music, or blur sensitive info
- Auto-generate AI captions and voiceovers
Export options:
- Save as MP4
- Upload to ScreenPal cloud with password protection
- Share via secure link
Ideal for: Educators, marketers, or remote workers who want polished videos fast.
No-Install Online Screen Recorders
Need to record quickly without installing anything? Web-based tools work directly in your browser.
ScreenPal Free Online Recorder: No Signup Needed
No download. No account. Just click and record.
How to use:
- Visit screenpal.com
- Click Start Recorder
- Choose: Browser tab, Window, or Full Screen
- Toggle Camera and Mic on/off
- Click Record (works in Chrome, Edge, Firefox, Safari)
Audio note:
– System audio is NOT captured in online mode
– Only microphone audio is recorded
Workaround: Use external mic and play system audio through speakers (not recommended for clarity)
After recording:
- Download as MP4 (Chrome/Edge) or WebM (Firefox)
- Edit online with AI tools: auto-captions, chapters, translations
- Share with unlisted or password-protected links
Limit: 5 free downloads without account
Professional Tools for Full Audio Control
When you need complete control over audio sources and video quality, these tools deliver.
OBS Studio: Free, Open-Source, Full Audio Mixing
OBS Studio is the gold standard for free, professional screen recording.
Why pros use it:
- Record multiple audio sources (mic, system, apps)
- Adjust volume levels in real time
- Apply audio filters (noise suppression, gain)
- No time limits, no watermarks
Setup steps:
- Download from obsproject.com
- Go to Settings > Audio → set default mic and desktop audio
- In Sources, add:
– Display Capture (your screen)
– Audio Input Capture (mic) - Click Start Recording
Learning curve: Slight, but worth it for podcasters, streamers, or educators.
Camtasia: Studio-Quality Editing and Output
Camtasia is the top choice for professional tutorials and presentations.
Features:
- Record screen + webcam + audio
- Advanced audio editing (noise removal, equalizer)
- Animated text, transitions, callouts
- Export with burned-in subtitles
Downside: Not free ($319.99 one-time), but ideal for businesses and creators who need studio-quality output.
Fix Common Audio Problems in Screen Recordings

Even the best tools fail if audio isn’t set up right. Here’s how to fix the most frequent issues.
No System Audio? Check These Settings
Problem: Only mic audio recorded, no system sound.
Solutions:
– In Windows, go to Settings > System > Sound
– Confirm correct output device is selected
– Try enabling Stereo Mix (if available)
– Test with wired headphones or speakers—wireless devices often block system audio capture
– For Clipchamp: only browser tabs support system audio
Pro tip: If using wireless headphones, record mic separately and mix audio later.
Crackling or Low-Quality Audio? Try These Fixes
Causes:
– Outdated audio drivers
– High CPU usage
– Poor mic placement
Fixes:
– Update audio drivers via Device Manager
– Close background apps before recording
– Use an external USB microphone for clearer voice
Note: ScreenRec v2.0.3 fixed crackling in system audio—ensure you’re using the latest version.
Best Practices for Professional-Quality Screen Recordings
Follow these tips to ensure your screen recordings sound and look polished.
Optimize Your Recording Setup
- Use headphones to prevent echo and feedback
- Close unused apps to reduce lag and background noise
- Test audio first with a short 10-second clip
- Record in quiet space for clean microphone input
Record Smarter with Shortcuts and Effects
- Break long videos into 5–10 minute segments—easier to edit and upload
- Use keyboard shortcuts (F12 in Bandicam, Win+Alt+R in Game Bar)
- Highlight mouse cursor and add click effects (Bandicam, OBS)
- Show keystrokes when teaching software (Bandicam feature)
Choose the Right Frame Rate for Your Content
- 30 FPS: Standard for most tutorials
- 60 FPS: Smoother for fast motion (gaming, animations)
- 120 FPS: Ultra-smooth (ScreenRec supports up to 120 FPS)
Which Screen Recorder Should You Use?
Here’s a quick decision guide based on your needs:
| Use Case | Best Tool |
|---|---|
| Quick Windows 11 recording | Snipping Tool or Game Bar |
| Record browser tab with audio | Clipchamp or ScreenRec |
| Instant sharing with link | ScreenRec |
| No install, browser-only | ScreenPal Online |
| Long recordings, no limits | OBS Studio |
| Professional editing & polish | Camtasia |
| Scheduled recordings (e.g., meetings) | Bandicam |
| AI editing, captions, translation | ScreenPal |
Frequently Asked Questions About Recording Computer Screen with Audio
Can I record system audio and microphone at the same time?
Yes. Tools like ScreenRec, Bandicam, OBS Studio, and Windows 11 Snipping Tool can capture both system audio and microphone input simultaneously. Ensure both are enabled in the app and Windows Sound settings.
Why is my system audio not recording?
Common causes include:
– Wireless headphones blocking system audio capture
– Incorrect default output device
– Stereo Mix not enabled (if required)
– Using Clipchamp or ScreenPal Online in desktop mode (they only capture system audio in browser tab mode)
Does ScreenPal capture system audio?
ScreenPal Desktop does (premium feature). ScreenPal Online does not capture system audio—only microphone audio is recorded.
How do I fix crackling audio in screen recordings?
Update your audio drivers, close background apps, and use a high-quality USB microphone. For ScreenRec, ensure you’re using version 2.0.3 or later, which fixed system audio crackling.
Can I record without installing software?
Yes. ScreenPal Online and Clipchamp allow browser-based screen recording with no installation. However, system audio capture is limited—Clipchamp only supports it for browser tabs.
Is there a free screen recorder with no watermark?
Yes. Snipping Tool, Game Bar, ScreenRec, Bandicam (free version), and OBS Studio all record without watermarks. Bandicam’s free version limits recordings to 5 minutes.
Key Takeaways for Recording Computer Screen with Audio
The best way to record computer screen with audio depends on your needs. For most users, Windows 11’s Snipping Tool or ScreenRec offers the perfect balance of simplicity, quality, and full audio capture. If you need more power, OBS Studio gives complete control. For quick browser recordings, Clipchamp or ScreenPal work well.
No matter which tool you choose, always test your audio setup first, use headphones, and record in a quiet space. With the right method, you can create clear, professional screen recordings in minutes—no expertise required.